


Hi Stampers!
If it's Friday, it must be Sketch Frenzy Friday--and it IS! Have we got a great sketch for you this week--created by ME!

And here's my card--actually 3 views--the full card, a closeup of the center and a closeup of the little embellishment on the bottom right corner:

I am so in love with the Autumn Spice DSP! And this card has a lot of texture going on: Vintage Wallpaper embossing folder, DSP punched with the Dotted Scallop border punch, stamped off images from the Day of Gratitude stamp set, three little acorns colored with Early Espresso and More Mustard markers-mounted on a strip punched with the Word Window punch out of Naturals White cardstock and mounted on a punched Cajun Craze small oval. I also used Pumpkin Pie grosgrain ribbon. It is not one of the colors listed with the Autumn Spice DSP, but I think it works very well with those colors. Here are the close ups:


Now, get out your cardstock, inks, and stamps and create your own interpretation of this sketch and upload to our BLOG. You can start at the BLOG to see all the creations OR go to the next stop on the tour, MELINDA'S BLOG
Enjoy!


 I used two different prints from the Autumn Spice DSP to make the top and bottom. This Designer Series Paper is cardstock weight, so it makes a nice sturdy bos. Here's how I did it:
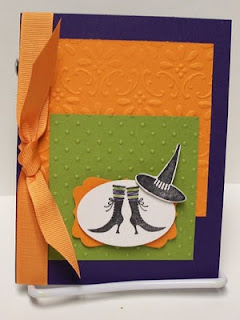 I used Concord Crush as the base of the card, some Pumpkin Pie cardstock embossed with the Finial Press embossing folder for the Big Shot, and some Old Olive cardstock embossed with the Perfect Polka Dots embossing folder. I also used the new Extra-Large Decorative label punch underneath the Wide Oval punch out which is stamped with the witch's boots from the Wicked Cool stamp set. I used Naturals White card stock for stamping. I colored the stockings with Concord Crush and Old Olive Stampin' Write markers, however it is a little difficult to see. Let me show you the inside of the card:
 I stamped the spider web, bats, and the word Spooky from the Wicked Cool set. Isn't that font cute?
 I think this is a FABULOUS sketch!!! Here's my card:


 When I received the printed cards, they were absolutely gorgeous! The Stampin' Up! printing partner prints true to Stampin' Up!'s exclusive colors.
 Enjoy!
 I chose to follow the layout closely, and created this card in MDS:
 I used Crumb Cake, Peach Parfait, Certainly Celery and Chocolate Chip for my colors. The faux ribbon across the card is Chocolate Chip stitching--one of the embellishments in MDS. In addition, I created my own sentiment and typed it on the card.
 To post this card, all I did was choose it in MDS and save it as is. It literally took me about 3 minutes! If you don't already have My Digital Studio, well, what are you waiting for? If you can choose a card and print it this fast, it certainly makes choosing a card faster than driving to a store! And you can always make it a hybrid card by adding elements after printing like buttons, ribbon, and brads.
 And here are two close ups of the two different ones I have made--so far:
 Sadly, the two stamps I used are no longer available. However, the paper I used IS available. On the Boo Treat, I used the smaller scallop circle and Basic Black card stock, Whisper White card stock, and some of the Night Owl DSP from the Holiday mini catalog. For the Spider treat, I used the larger scallop circle punch with Basic Black card stock. I also used Whisper White and Pumpkin Pie card stock with two of the oval punches. Oh--the candy used is (are?) York Peppermint Patties.

